Creating a personalized memory box in just one evening might seem challenging, but with a clear plan, you can craft something meaningful and beautiful. The key is to gather the right keepsakes, organize them efficiently, and add your personal touch quickly. Still, the process involves more than just collecting items—you’ll need to decide on a theme, arrange everything thoughtfully, and make it uniquely yours. Ready to discover how to do it step by step?
Key Takeaways
- Gather a theme, meaningful keepsakes, and decorative supplies before starting to streamline the process.
- Sort and select the most significant photos and mementos, discarding duplicates or less meaningful items.
- Personalize your box with decorative touches like labels, stickers, ribbons, or handwritten notes for emotional resonance.
- Arrange larger items first, secure delicate keepsakes, and fill gaps with tissue or foam for stability.
- Finalize by adding captions or notes, ensuring a cohesive, personal presentation within your chosen time frame.
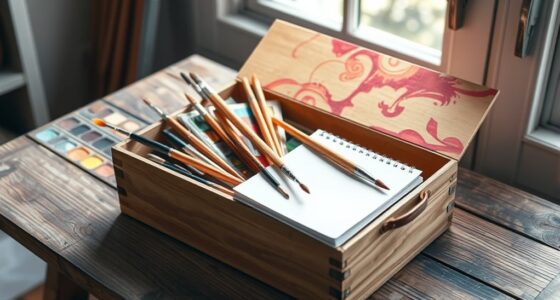
Gather Your Materials and Choose a Theme

Before you begin assembling your memory box, it’s important to gather all the necessary materials and decide on a theme. Start by selecting suitable storage containers—think sturdy boxes or decorative trays—that will protect and display your keepsakes. Next, consider using journal prompts to help you identify meaningful memories and decide what items to include. These prompts can guide you in reflecting on special moments, favorite photos, or sentimental objects. Having a clear theme—such as a specific event, a year, or a personal milestone—will give your memory box focus and coherence. Collecting everything beforehand guarantees you have all you need to craft your personalized keepsake without interruptions, making the process smoother and more enjoyable. Incorporating self-watering plant pots into your space can also create a calming environment that enhances your reflection process.
Select and Organize Your Memories

Once you’ve gathered your materials and chosen a theme, it’s time to select and organize your memories. Start with sentimental sorting—group items by events, people, or periods that hold meaning. As you do this, consider photo preservation; handle your photos carefully to prevent damage and decide which images truly capture your memories. Choose the most meaningful photos, keepsakes, and mementos to include. Arrange them in a way that tells a story or flows naturally, making it easier to recall special moments. Discard duplicates or items that no longer resonate. Keep your organization simple yet intentional, so your memory box feels personal and manageable. This step guarantees your collection reflects your story while remaining easy to access and enjoy. Incorporating safe handling techniques can help preserve delicate items and ensure your memories last over time.
Personalize Your Box With Decorative Touches

Adding decorative touches is a fun way to make your memory box uniquely yours and visually appealing. Choose a color scheme that reflects the mood or theme, like pastels for softness or bold hues for vibrancy. Incorporate gift wrapping ideas, such as wrapping the box with patterned paper or adding ribbons, to enhance its presentation. Personal touches like stickers, washi tape, or handwritten notes can also add charm. Consider this table for deeper meaning:
| Color Scheme | Gift Wrapping Style | Decorative Elements |
|---|---|---|
| Calm & Soft | Ribbon & Bow | Photos & Mementos |
| Bright & Bold | Patterned Paper | Quotes & Tags |
| Elegant & Classic | Satin Wrap | Embellishments |
These touches make your memory box not just a container but a reflection of your personality. Incorporating glycolic acid products in your skincare routine can also enhance your skin’s appearance, making your memory box even more special with a radiant glow.
Arrange and Secure Your Keepsakes

After decorating your memory box to reflect your personality, the next step is to thoughtfully arrange and securely fasten your keepsakes. Begin by placing larger items first, ensuring they’re stable and easy to view. For photos, prioritize photo preservation by using acid-free sleeves or mounting them with archival tape to prevent deterioration. Label each keepsake with clear, concise keepsake labeling to identify its significance, which helps keep your collection organized. Secure delicate or lightweight items with glue dots or double-sided tape to prevent shifting. For added stability, use foam or tissue paper to fill gaps, avoiding damage over time. Carefully review your arrangement to ensure everything stays in place, creating an accessible, meaningful display of your cherished memories. Incorporating float mounting textile art techniques can also add a unique decorative element to your memory box.
Finalize Your Memory Box and Add Personal Notes

To truly personalize your memory box, take the time to finalize its arrangement and add meaningful notes. Use thoughtful handwriting techniques to write captions or short stories that evoke emotion. Consider experimenting with different color schemes in your notes or labels to create visual harmony, enhancing the overall aesthetic. Writing in your own handwriting adds a special, authentic touch that makes the memory box uniquely yours. Don’t rush this step—carefully place each keepsake, ensuring everything flows cohesively. Add personal notes or memories next to each item, describing their significance or recalling a special moment. Incorporating personalized touches such as handwritten labels or custom color schemes can elevate the emotional impact of your memory box. This final touch transforms your memory box from a collection of objects into a heartfelt tribute that’s both organized and emotionally resonant.
Frequently Asked Questions
How Do I Choose a Meaningful Theme for My Memory Box?
You start by thinking about what truly matters to you. Consider seasonal motifs that reflect the time of year or sentimental symbols that hold special memories. Think about symbols, colors, or themes that evoke emotion or connection. Choose elements that resonate personally, making your memory box a heartfelt reflection of your story. The right theme will naturally inspire your selections, creating a meaningful and beautifully personalized keepsake.
What Tools Are Best for Securing Delicate Keepsakes?
When securing delicate keepsakes, you want tools that protect and preserve. Use acid-free tissue to gently wrap fragile items, preventing damage from moisture or abrasion. For attaching items securely, opt for archival glue, which is acid-free and designed to prevent deterioration over time. These tools guarantee your memories stay safe and intact, giving your personalized memory box a professional, long-lasting touch.
How Can I Personalize My Box Without Professional Help?
You can totally make your memory box unforgettable with just a few DIY decorations and personal photos! Don’t worry about needing professional help—your creativity is the best tool. Use colorful washi tape, hand-drawn designs, or meaningful stickers to add a personal touch. Fill it with your favorite photos, notes, or mementos. This way, your box becomes a one-of-a-kind treasure chest that truly reflects your personality and memories.
What’S the Best Way to Preserve Fragile Mementos?
To preserve fragile mementos, you should consider using preservation techniques like acid-free tissue paper and sturdy storage boxes to prevent deterioration. Handle items carefully and avoid direct sunlight. For display options, opt for UV-protective glass or acrylic to showcase your favorites while protecting them. These steps help maintain your treasured keepsakes, ensuring they stay beautiful and intact for years to come.
How Long Does It Typically Take to Complete a Memory Box?
The time estimation for completing a memory box varies based on your project planning and the amount of memorabilia you want to include. Typically, it takes around 2-4 hours if you’re organized, but it can extend if you’re meticulous or adding personalized touches. Focus on setting a clear plan beforehand, gather your materials, and allocate specific time blocks. This approach helps you finish your project efficiently, even in one evening.
Conclusion
In just one evening, you’ve created a keepsake that’s more precious than a treasure chest filled with gold! Your memory box is now a doorway to the past, packed with stories, laughter, and love that could outlast centuries. It’s a masterpiece of your heart and soul, ready to be treasured forever. Who knew that in a few hours, you could craft something so powerful, so emotional, it might just become the most cherished thing you own?