TL;DR
Moving your rig out of your main space is the most effective way to reduce noise. When you can’t, using proper placement, acoustic dampening, and ventilation in a closet setup makes a huge difference. A ‘rig in the closet’ can work well if you address heat and sound leakage properly. Learn more about acoustic dampening and placement.
Ever wondered if you can actually turn a tiny closet into a workable studio? The truth is, the biggest noise reductions happen when you simply put distance between you and the rig. You’re about to discover why moving your noisy machine into another room beats stacking foam on your wall.
This guide breaks down the real tricks: placement, dampening, and ventilation. Whether you want a silent workspace or a decent vocal booth on a budget, understanding these principles will save you time, money, and frustration.
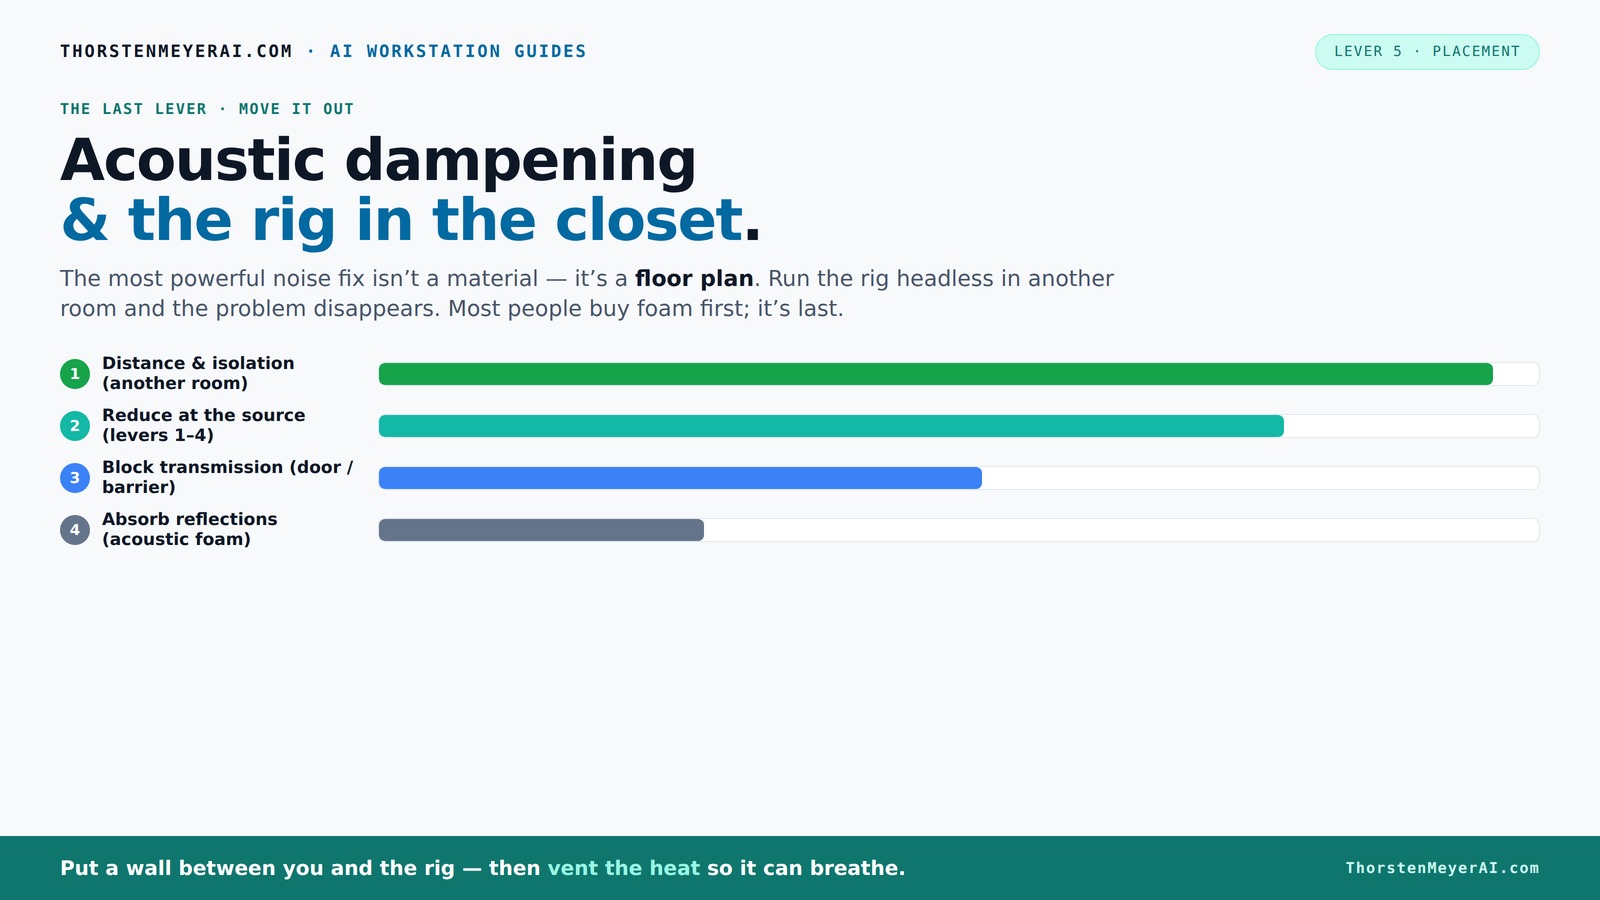
Acoustic dampening
& the rig in the closet.
The most powerful noise fix isn’t a material — it’s a floor plan. A rig you can’t hear because it’s in another room beats any amount of foam. Tap the approaches in Part 1 to see what actually works.
(another room)
(levers 1–4)
(door / barrier)
(acoustic foam)
Contain the noise, not the heat
Key Takeaways
- Moving your rig into another room or closet is the most effective noise control—distance beats foam every time.
- Proper ventilation is critical when placing a high-heat machine in a closet; active exhaust and temperature monitoring are essential.
- Acoustic foam reduces echo but doesn’t block sound leakage; seal gaps and treat reflection points for better results.
- Treat the surfaces your mic ‘sees’: behind it, the door, and the ceiling — strategic placement makes a big difference.
- Choose your microphone wisely; dynamic mics often work better in reflective, small spaces to cut down on unwanted room noise.

Focusound 52 Pack Acoustic Foam Panels 1" x 12" x 12" Sound Proof Foam Panles Soundproofing Noise Cancelling Wedge Panels for Home Office Recoding Studio with 300PCS Double-Side Adhesive
Soundproofing - Acoustic foam panels triangular grooves structure for better noise absorption, helps to reduce and absorb unwanted...
As an affiliate, we earn on qualifying purchases.
As an affiliate, we earn on qualifying purchases.
Why Distance Trumps Foam for Noise Control
Distance and isolation are the kingpins of noise reduction. If your goal is silence, the best move is to put your rig in another room or even in a closet on the other side of the house. This simple step can cut noise levels by over 80% compared to just stacking foam panels.
Imagine your noisy GPU and fans roaring in a separate room while your workspace stays whisper-quiet. That’s because sound diminishes as it travels away from the source. The more distance, the less you hear.
For AI workstations, this setup is ideal. You can SSH into a rig in a closet or basement, making noise a non-issue. The key is a solid network connection and proper ventilation, which we’ll cover next.

Ekkogo Studio Monitor Isolation Pads Premium Acoustic Foam Elevates Audio Ideal for 5 Inch Speakers Enhanced with Vibredux HD Foam for Superior Isolation
【ADVANCED VIBREDUX HD FOAM】: Experience the acoustic excellence of Vibredux HD foam with Ekkogo's Studio Monitor Isolation Pads....
As an affiliate, we earn on qualifying purchases.
As an affiliate, we earn on qualifying purchases.
The 'Rig in the Closet' Setup — The Pros and the One Big Catch
Putting your noisy machine inside a closet or cabinet is a game-changer. It isolates sound, making your workspace nearly silent. But there’s a catch: heat buildup. A sealed space traps hot air, and a rig pushing 600W or more can turn into a sauna if you’re not careful.
For example, a friend placed his GPU in a small closet with a passive vent. You can find tips on proper placement and acoustic dampening. At first, it worked great. But after a few hours, the temperature spiked, causing the fans to scream and throttle.
The solution? Active ventilation. Install a quiet exhaust fan to pull hot air out and draw cooler air in. For more details, see ventilation and soundproofing tips. Better yet, use purpose-built soundproof cabinets with ducted airflow, temperature sensors, and exhaust fans. These can keep your rig cool and quiet at the same time. Check out this cooling guide for specifics.
Understanding this tradeoff is crucial: the benefit of a quiet, enclosed space is significant, but without proper heat management, your equipment can overheat, leading to reduced lifespan or performance. Investing in proper ventilation means balancing noise reduction with thermal regulation, which is essential for a reliable setup.

VEVOR Portable Vocal Booth, 6.56 ft Height, Portable Recording Studio with Travel Bag, Mobile Tablet Stand, Thickened Soundproofing, Sound Isolation Booth for Echo-Free Vocals, Podcasts, Voiceovers
Say Goodbye to Echoes: Built with durable Oxford cloth and acoustic padding, this recording booth for the home...
As an affiliate, we earn on qualifying purchases.
As an affiliate, we earn on qualifying purchases.
How to Properly Ventilate a Closet Rig — Keep It Cool and Quiet
- Install a passive vent or small duct opening to let hot air escape. This simple step allows natural convection to carry heat away, reducing reliance on noisy fans.
- Add a quiet, thermostatically controlled exhaust fan. This keeps the temperature steady while dampening noise, preventing overheating without adding constant background noise.
- Use ducting to direct hot air outside or into an unoccupied space. Proper ducting ensures heat is moved away efficiently, avoiding heat recirculation inside the closet.
- Place a temperature sensor inside to monitor heat levels. This helps you fine-tune your ventilation system and prevent thermal stress on your hardware.
For example, a DIYer used a low-noise PC fan connected to a smart thermostat. It turned on only when the temperature hit 75°F, preventing overheating and fan noise. This approach balances noise control with thermal safety.
Proper ventilation isn’t just a technical detail—it’s the backbone of a successful 'rig in the closet'. Check out this guide on ventilation and soundproofing. Without it, heat will build up, causing noise from fans ramping up or, worse, hardware failure. Thoughtful airflow management ensures your setup remains both quiet and safe.
IsoAcoustics Iso-Stand Series Speaker Isolation Stands with Height & Tilt Adjustment: Iso-130 (5.1" x 6”) Pair
5.1” (130mm) Wide x 6” (152mm) Depth. 2.8” (71mm) Height in low setting. 8.25” (210mm) height in tall...
As an affiliate, we earn on qualifying purchases.
As an affiliate, we earn on qualifying purchases.
Acoustic Dampening: What Works and What Doesn’t
Acoustic foam and panels are great at reducing echoes and internal reflections within a small space, but they don’t inherently block sound from leaking out. Think of foam as softening the room’s reflections, not creating a barrier to sound transmission. This distinction is crucial because many assume foam alone makes a space soundproof, which it does not.
For example, covering your closet door with foam or blankets can reduce internal echo and flutter echoes, making recordings clearer. However, if you want to prevent sound from escaping into other rooms or outside, you need to add barriers—such as weatherstripping around the door edges or sealing gaps in the walls. These prevent sound leaks that foam alone cannot address.
Understanding this tradeoff helps you decide where to invest your efforts: do you primarily want to improve on-site sound quality or reduce noise leakage? Often, a combination of both strategies yields the best results.
Absorbing Reflections to Improve Sound Inside the Closet
Strategic placement of acoustic panels can significantly improve the sound quality within your closet, especially for recording or voice work. Learn more about acoustic treatment and textile solutions. Focus on the surfaces where reflections bounce back into the microphone—typically behind the mic, the ceiling above, and side walls. Proper placement ensures that unwanted echoes are minimized without over-treating the space, which can make it sound unnaturally dead.
Imagine a vocal booth: the mic points at a foam-covered wall behind it, reducing echo and ringing. Covering the door and ceiling with absorption material can soften flutter echoes and prevent the space from sounding 'boxy' or hollow. This targeted approach maximizes sound clarity while avoiding excessive deadening.
In tiny rooms, adding bass traps in corners can tame low-end rumble and standing waves, which are common in small, parallel-walled spaces. For example, a podcaster installed thick panels along the side walls and a bass trap in the corner, noticing a clearer, more professional sound with less muddiness and more focus.
Choosing the Right Acoustic Treatment for Your Closet Studio
- Foam panels are lightweight, affordable, and effective at reducing mid-to-high frequency reflections, which are most problematic in small spaces.
- Thick panels or bass traps are necessary for controlling low frequencies, especially in larger or more reflective rooms where standing waves and rumble can muddy recordings.
- Blankets, rugs, and curtains are budget-friendly options for quick, effective damping, and can be strategically used at reflection points or as door treatments.
For example, voice-over artists often start with blankets on the door and foam panels behind the mic. Upgrading to bass traps in corners and ceiling panels can significantly improve clarity and reduce muddiness, especially for professional-level recordings. Recognizing the specific acoustic issues of your space guides your treatment choices, balancing cost and effectiveness.
Remember, the goal isn’t perfect acoustics but reducing reflections and low-end issues that compromise your recordings. Tailor your treatments to your needs and budget for the best results.
How Much Treatment Is Enough? When to Stop Adding Panels
Less is often more when it comes to acoustic treatment. Starting with the most critical reflection points—behind the mic, the door, and the ceiling—can have a dramatic impact without overloading the space. Over-treating can make the room sound unnaturally dead, which may negatively affect the naturalness of your recordings and the comfort of your workspace.
In a small closet, treating about 20-30% of the wall surfaces with foam or blankets typically yields noticeable improvements in sound clarity and reduction of echo. After initial treatment, conduct a test recording—if the sound is clearer and reflections are minimized, you’ve achieved a good balance. Adding more panels beyond this point may yield diminishing returns or even degrade the natural sound you want to capture.
Remember, the goal is to control problematic reflections and low frequencies, not to create a perfectly dead room. Use your ears as a guide and record test clips after each addition to evaluate progress. This iterative approach prevents unnecessary over-treatment and ensures your space remains functional and natural-sounding.
Mic Choice Matters in a Small, Reflective Space
In tight, reflective spaces like closets, your choice of microphone can greatly influence the quality of your recordings. Dynamic microphones tend to reject more of the room’s reflections and background noise, making them well-suited for small, untreated or partially treated spaces. Condenser mics, while more sensitive and revealing, can pick up every echo and room tone, often requiring more extensive acoustic treatment to sound professional.
For example, a voice-over artist switched from a condenser to a dynamic mic in her closet booth. She immediately noticed less room echo and a cleaner, more focused voice. This change reduced the amount of treatment needed and simplified her setup.
Choosing the right mic isn’t just about sound quality; it’s about understanding your space’s limitations. A dynamic mic paired with strategic placement and minimal treatment can produce excellent results with less effort, saving you time and money while still achieving clear, professional recordings.
Understanding Soundproofing vs Acoustic Treatment
Soundproofing and acoustic treatment serve different but complementary purposes. Soundproofing aims to block sound from leaving or entering a space—think of sealing gaps, adding mass, or decoupling walls. Acoustic treatment, on the other hand, focuses on controlling how sound behaves inside the room—reducing echoes, flutter, and low-frequency issues to improve clarity.
For example, sealing gaps around the closet door with weatherstripping reduces sound leakage, a soundproofing measure. Meanwhile, adding foam panels inside the closet minimizes internal reflections, an acoustic treatment step. Both are important, but in small spaces, prioritizing internal reflection control often yields more immediate benefits for recording quality.
Most closet studios start with acoustic treatment to improve sound quality and then consider soundproofing if noise escape or ingress remains a problem. Balancing these strategies depends on your specific needs—whether you’re more concerned with internal sound quality or external noise intrusion.
Frequently Asked Questions
Can a closet really become a good vocal booth?
Yes, with proper treatment and ventilation, a closet can produce professional-sounding vocals. Focus on sealing gaps, adding absorbent panels behind the mic, and managing reflections.What’s more important: soundproofing or acoustic treatment?
For most small closet setups, acoustic treatment to reduce echo and reflections is more immediate. Soundproofing is secondary unless you have loud neighbors or want to prevent sound escape.How much treatment do I need for a small space?
Start with covering reflection points behind the mic, the door, and ceiling. Typically, 20-30% wall coverage with foam or blankets is enough to drastically improve sound quality.Will acoustic foam stop noise from leaking out?
No. Foam absorbs inside reflections but doesn’t block sound transmission. Sealing gaps and using barriers are necessary for soundproofing.What’s the best microphone for a small closet studio?
Dynamic microphones tend to reject more room noise and are often better suited for reflective spaces, making your recordings clearer with less treatment.Conclusion
Turning a closet into a decent studio isn’t about perfect insulation or endless panels. It’s about smart placement, effective dampening, and managing heat. When you treat the space as a whole — not just add foam — you get a clean, quiet setup that actually works.
Remember: the best soundproofing is not just about blocking noise but about controlling reflections and heat. Your closet can become a surprisingly good workspace if you focus on what really matters.